Posts

Showing posts from May, 2014

Leura Cascades Waterfalls

Image
The Levels of Leura Cascades The shortest, easiest and beautiful bush walks I ever did.  Highly recommended to anyone at any age. Waterfalls are beautiful. They are dynamic, cool and serene. I prefer to see waterfalls after the rain.  This way, you're sure that a significant amount of water flows downstream.  But waterfalls are usually located at the heart of the forest.  They are not easy to find nor easy to access. The whole track could take hours and slopes could be challenging. Leura Cascades is one beautiful cascading waterfalls.  It is easily accessible.  There are signs at the entrance and the route is clear.  Wooden pathways are made with handle bars for safety.  If you're going to walk without taking photos or stopping, you'll only need less than an 30 minutes to complete. Getting There Leura Cascades can be accessed via Cliff Drive to Chelmsford Drive.  There are no branching road at Chelmsford Drive.  It's not a hard ...
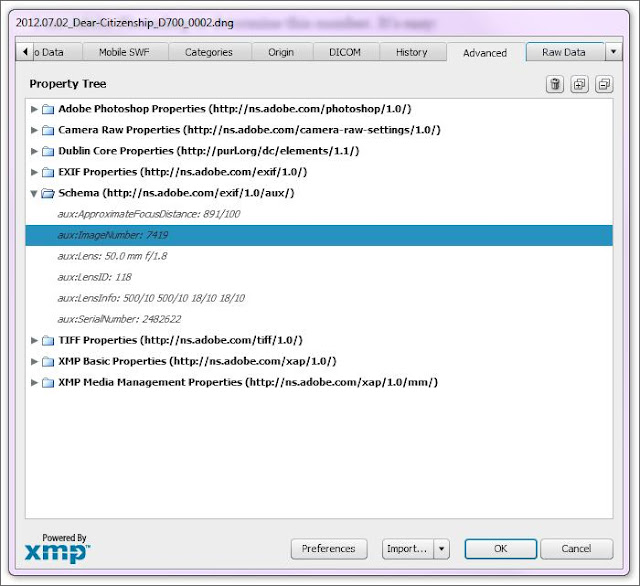
Find the Shutter Count in Photoshop

Image
Photoshop can determine the shutter count of a camera.  Load a RAW file and follow the steps below. From the Menu Bar: File->File Info... On the new dialog box: Advance Tab->Schema (http://ns.adobe.com/exif/1.0/aux/) Find this: aux:ImageNumber:xxxx xxxx is the number of shutter actuations your camera has made so far. I don't usually look at these numbers.  I only look at them when selling or buying (used) camera bodies.  In general, the lower the number, the lesser the usage.  This is one of the factors that influences the value of a camera when you're selling. From Shutter Actuation of a Camera There are freewares that determine the shutter count or shutter actuations. Some popular softwares are Opanda EXIF reader and IrfanView . For Irfanview, you still need to install a plugin for it to work, but it's fairly easy to do. The plugin is also downloadable in Irfanview plugin section of their website. Both software can also read EXIF data, so you're going ...

Lee Resin Filter vs Lee ProGlass Filter

Image
As landscape photographers, we rely on our filters to cut down the dynamic range of a scene.  As we become serious, we want our filters to be durable, scratch resistant, 'neutral' (no color cast) and gives the highest possible image quality.  Lee offers a wide range of quality filters that is affordable to most photographers. Lee has two types of Neutral Density (ND) filters: ProGlass and Resin.   Resin is like high quality plastic.  They are light and durable. They don't shatter like glass. They are cheaper than glass and is made of resin.  Since they are cheap, they're a great way of filtering light on a budget before you go after the more expensive ones. ProGlass on the other hand is heavier.  They feel more solid.  But since they're glass, they shatter when dropped on solid floor.  Glass filters are more expensive that resin and are considered 'better'. But better in what?  By how much? Lee’s resin filters are about $80-$100 cheaper than ...

Tripod Feet Replacement

Image
Tripod's Rubber Feet Replacement One of my essential items while shooting is a tripod. I got a Manfrotto 190CX3. It’s a carbon fiber tripod with 3 leg sections. It's light and sets up fast. Everything was perfect except for one rubber tripod foot. It’s quite loose compared to the other rubber tripod feet. This single rubber tripod foot already fell off several times. I was tempted to glue it permanently but I avoided the idea since I was thinking that there might come a time that I may need to remove it (e.g. feet upgrade, bottom foot/feet all worn out). The most unfortunate thing happened, I lost this tripod foot! How? I was in Thredbo, NSW Australia and was enjoying the snow. Since the snow is soft on top, I tried to bury the tripod every time I shoot to make it more stable. Of course, I pulled the tripod afterwards and one of those instances I noticed that one of the feet was missing! It’s a bit irritating to lose something in the middle of the snow and haven’t got any idea ...

Glow Worm Tunnel via Lithgow

Image
Worms that glow in the dark... interesting isn't it?  But they do exist!  I got photos :) A friend of mine invited me to go on an adventure in Lithgow.  One of his destination was a Glow Worm Tunnel.  It wasn't interesting at first.  But the more I researched, the more I became interested.  I wanted to see the worms glow, and take photos of it. Preparation Before going, make sure you have a headlamp or flashlight.  This gadget is imperative to finish the tunnel safely.  The tunnel is not lit (unlike a subway).  Bring your own light.  I suggest to grab a flashlight or headlight with different light levels.  If you can bring two (2) lights, the better as you have redundancy.  You don't need spare batteries, especially if you're batteries are fresh.  The walk inside the tunnel will only take several minutes. You're going to walk in a damp environment.  There might be mosquitoes.  If so, bring mosquito / insect repel...